CASE STUDY
How Nissan Reduced Data Prep Time by 50%
Nissan Motor Corporation uses 3D printing technology to create prototypes and experiment with new vehicle shapes. This involved a lot of manual work. Thanks to Materialise software, they managed to change the entire process and make it much more efficient. Data preparation time was reduced from months to seconds.

Industry
Automotive
Key solutions
Materialise Magics
Sinter Module
The impact
Making the entire 3D printing process more efficient
Automating production
Eliminating repeated manual data preparation operations
Data preparation time reduced from months to seconds
Significantly reducing data preparation and support removal time
Since the build platform is limited in size, certain large parts need to be cut and printed as separate parts. In the past, Nissan used CAD software to split large parts into smaller ones. It could take about three days to get large parts split. Now they use Materialise Magics software, reducing data preparation time by 50%.
"With the splitting function in Materialise Magics, objects can be easily split at a specified location, and work time is reduced by about half," explains Nissan. "There's also a useful function that can automatically create positioning pins when the split is performed, which makes position matching during assembly easier."
Another challenge Nissan experienced is that when using powder sintering, there's a risk that the components will warp or bend during formation due to the high temperatures. As figure 3 shows, they can currently prevent this by creating support structure. Because the connection between the support and the component can be made extremely fine, the support structure is easy to remove, speeding up post-processing.
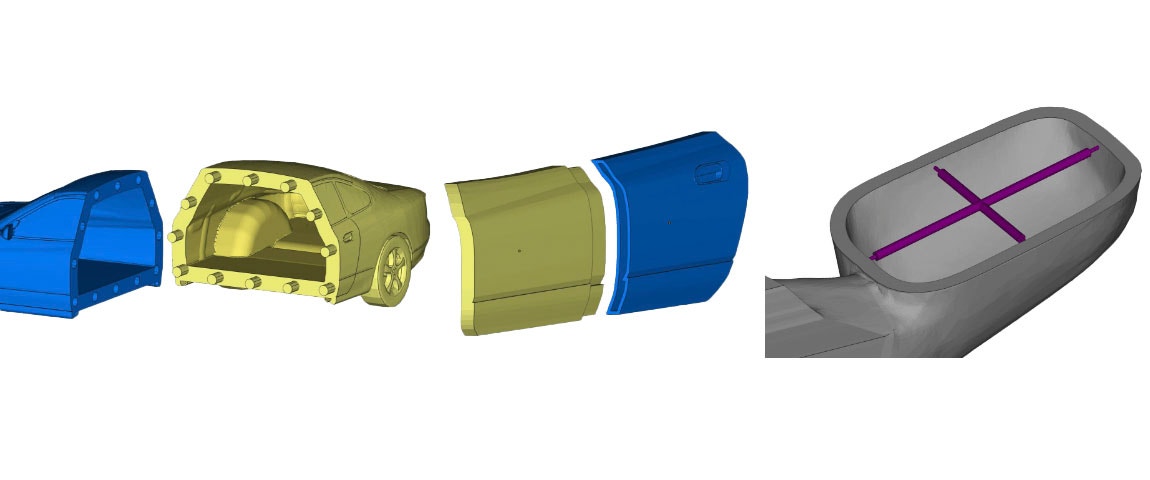
Fig. 1, 2, and 3
Fig. 1: Splitting function
Automatic creation of positioning pins on the cut face (set pins also supported).
Fig. 2: Splitting function
Fit can also be created during the split.
Fig. 3: Support creation function
Pillars and other supports for preventing deformation can be created by simply clicking on the two points that need support.
From one month's work to a few clicks
Next to splitting large parts, Nissan also used to spend much time on setting the right wall thickness. When they scale down the 3D model of one of their vehicles, the wall thickness of the part becomes correspondingly thinner, resulting in data that cannot be printed. In the past, they manually changed the designs in CAD. A task that required about one month of work.
"We had to search through over 20,000 points of data to find the components with thin walls and then increase their thickness. For any parts where a one-piece 3D print was needed, a great deal of work was spent to change the originally designed inter-part gaps so that there was a connection between the parts," explains Nissan.
Today Nissan saves a lot of time by using our Magics software that automates these steps.
"Since we started using Materialise Magics, processes such as automatic data error correction, searching for thicknesses by an arbitrary value, and merging the data can all be performed with a single click, drastically reducing the work time required (Fig. 4). In addition, by using the wall thickness analysis function, the thickness of each part can be visualized, preventing thin-walled parts that cannot be 3D printed from being overlooked. (Fig. 5) Furthermore, after selecting an arbitrary area, it is easy to change the thickness for that area. This is a function we frequently use. (Fig. 6)".
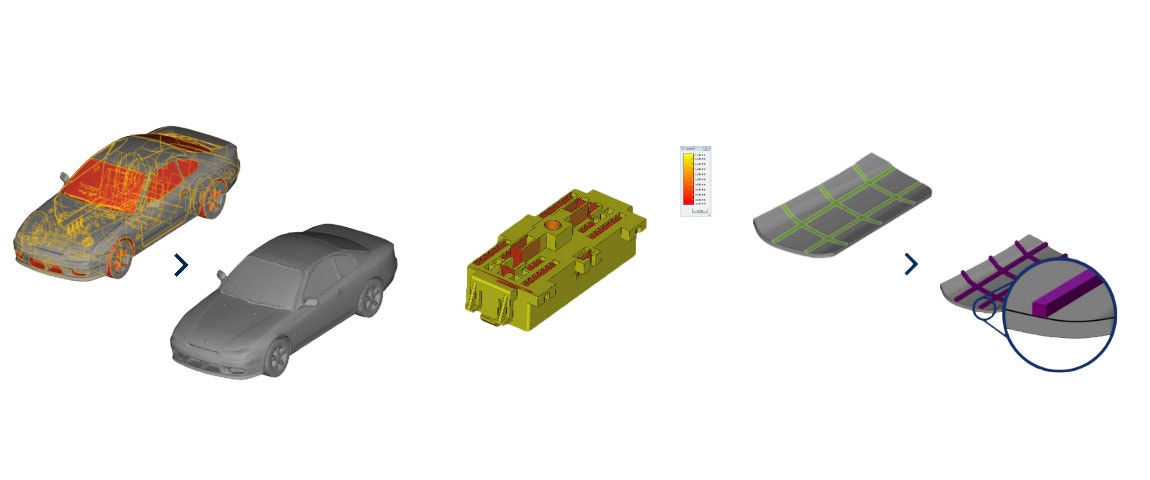
Fig. 4, 5, and 6
Fig. 4: Wrapping function
Automatic creation of positioning pins on the cut face (set pins also supported).
Fig. 5: Wall thickness analysis using gradation
By using the wall thickness analysis function, the thickness of each part can be visualized, preventing thin-walled parts that cannot be 3D printed from being overlooked.
Fig. 6: Support creation function
Pillars and other supports for preventing deformation can be created by simply clicking on the two points that need support.
Automatic 3D placement for powder sintering 3D printers vastly reduces work time
Before - repeated manual data preparation operations took a long time
The most important aspects of the operational efficiency of a powder sintering 3D printer are placing the parts so that the maximum number can be formed at one time and restricting the height once the parts have been placed. This approach reduces the costs for materials and the build time, and optimizes machine usage.
"Before Nissan started using the Magics Sinter Module, they used the software that came with the 3D printer to manually place the parts so they wouldn't touch each other while also restricting the height as much as possible (steps 1 & 2). After that, they'd use the same software to check for any interference between the parts. Manual part placement took a long time and the calculations for the interference check could also take several hours (step 3).
"This not only delayed the start of the 3D printing, but also made it impossible to create a production schedule because we didn't know when the calculations would finish - it was really tough for us. If interference was discovered, we had to redo the layout manually and then run another interference check, which was a problem in terms of both scheduling and staff hours," says Nissan.
After - the Sinter Module supports optimal placement and improves overall process efficiency
"Today, because the Sinter Module in Magics automatically places the components while also maintaining a set interval between parts and limiting the height, it is no longer necessary to spend several hours checking for interference and then repeating the manual layout work. Since the Sinter Module can place the components while maintaining the correct spacing, parts that couldn't be fully placed within the build platform and had to be divided over multiple build platforms can now be completed in a single print. By increasing the capacity of a single build job, we can reduce the number of labor hours, the amount of printer occupancy time for operations such as data preparation, printing time, and cooling time, and the amount of wasted raw materials as well. As a result, the entire 3D printing process is now more efficient!" - Nissan
Featured products and services
Share on: